Avoid using sudo and root whenever possible (reasons)
Preparation
Installing Docker
- Create a docker account at https://www.docker.com/
- Install docker client for your OS
- Create a docker swarm:
docker swarm init --advertise-addr {my.ip.addr.ess}
Installing node.js and NPM
It is recommended to use a node version manager to install node.js & npm. Two well- known version managers are nvm and n. These managers allow you to install multiple versions of node/npm, to switch between them easily, and to avoid “global installs” (which would necessitate sudo/root access).
Linux, Mac:
First, run the nvm install script from the link above (curl or wget). Afterward, you may have to configure your current shell environment:
bash source ~/.bashrc
Execute the following command, to install both node and npm:
nvm install node
Alternatives (nodesource) to using a node version manager:
Downloading and installing Node.js and npm
Windows:
See nvm-windows
Install the AppBuilder
Install our ab-cli tool. One of it’s functions is to install the AppBuilder, optionally with the developemnet environment. Use the following command:
npm install -g digi-serve/ab-cli
Then, run the installer. Specify your own target directory in place of {install_dir}, for example:
appbuilder install {install_dir} --develop
Option Definitions
--develop: executes git clone commands to bring down the source code
Recommended Settings
This installer will ask the following prompts.
? What Docker Stack reference do you want this install to use: ab
? What port do you want AppBuilder to listen on (80): 8080
? Do you want to expose the DB : Yes
? What port do you want the DB to listen on: 3306
? Enter the password for the DB Root User? root
? Which Docker Tags to use [master, develop, latest]: latest
? Authentication type: login
? Enter the URL for the auth service redirect: http://localhost:8080
? Do you want to enable the RELAY service : No
? Enter the Tenant Administrator Username: admin
? Enter the Tenant Administrator password: admin
? Enter the Tenant Administrator email: admin@email.com
? Enter the Tenant Administrator URL: http://localhost:8080/
Don’t use ports 8088 and 8889 as these are used for the test stack.
Starting AppBuilder
Run UP.sh
cd {install_dir}
./UP.sh -d
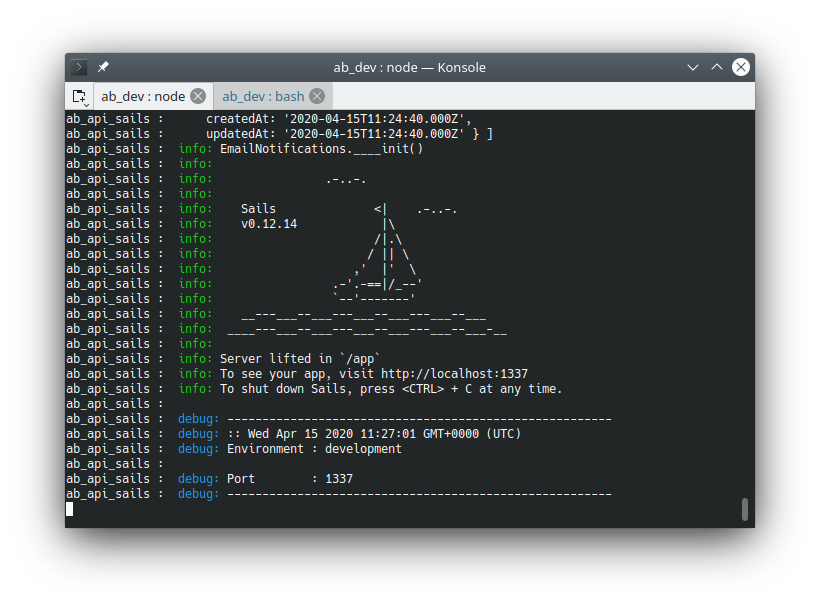
When you see the following screen, it means that the AppBuilder stack has successfully loaded.

In a browser open:
http://127.0.0.1:{port_number}
Additional Information
If using --develop flag, the various code repositories will be located at: {install_dir}/developer/
Frontend code is found in /developer/ab_platform_web and /developer/plugins/ABDesigner.
These repositories use webpack and compile to /developer/web/assets.
To see changes to the code live use npm run watch in each repository.
Files That You Should Know About
Config file: {install_dir}/.env - This will be generated based on your answers during the install
Docker production environment configuration file: {install_dir}/docker-compose.yml
Docker development environment configuration file: {install_dir}/docker-compose.dev.yml
Convenient helper - bring up all AppBuilder Docker services: {install_dir}/UP.sh
Convenient helper - shut down all AppBuilder Docker services: {install_dir}/Down.sh
Convenient helper - restart a single AppBuilder Docker service: {install_dir}/restart.sh {docker_service_name}
Convenient helper - enter a docker shell session: {install_dir}/cli.sh
Windows notes:
Sometimes .sh files will fail this may be because the line ending was set to CRLF To check this, look at the bottom right hand corner of your IDE when suspect .sh file is open
If this fails,
https://github.com/microsoft/WSL/issues/5923
“An error occurred mounting one of your file systems. Please run ‘dmesg’ for more details.”
WSL may be set to wrong default. Try running ‘bash’ or ‘wsl’
If they fail:
“wsl -l to discover this and wsl -d
E2E Testing
The following explains how to work with our E2E tests.
Install Tests:
Use the ab-cli tool to install tests. From your install directory run:
appbuilder test add
Use space to select which tests to install, then Enter.
Run Tests:
There are two main options for running the tests
1) Run the test in a test stack:
npm run test:boot
Since the test will reset the database, this is recommeneded if you keep test data in the main stack.
2) Run the test in the main stack
`./UP.sh -dt`
To acually run the test launch cypress with the command:
npm run cypress:open
Follow the on screen prompts to start and E2E test file.
Test can also be run headless as well with npm run test:e2e
Note: If you have any trouble, you may need to update the environment variable in .env. Look for the CYPRESS_* variables.